

AmCham Australia — Events Team

Onboarding progress
Your sessions
Building an Event

009-01 Create a New Event
00:00:05:39 - 00:00:18:14
The event feature is a bit like a campaign platform within a campaign platform. There’s forms, there’s lists, there's emails, there's texts and there's really great automatic data insights.
00:00:18:18 - 00:00:26:49
In this tutorial, I'm going to walk you through the steps on how to create an event. Let's dive in.
00:00:27:03 - 00:00:44:07
So first from the home page, let's click on the events icon, then select Create New event. Now let's put in the event details so your event name and description “new members dinner” and for the description, I’ll write “let's meet everyone”.
00:00:44:11 - 00:00:47:11
Okay, let's set our date and time.
00:00:47:15 - 00:01:04:10
Now, because this is a modern platform in a modern world, we have three options for location settings; online to create a 100% online event with our integration with Zoom, hybrid, which will require a physical address and create an online event or venue.
00:01:04:14 - 00:01:11:20
I'll select this option as a basis for in-person events. I'll write the address. Fantastic.
00:01:11:24 - 00:01:21:48
This section here is where you can create custom fields for events. This helps you track data across your events and record events on people's profiles.
00:01:22:02 - 00:01:29:49
Here you can see we’re tracking event type, I'll select member only. For location I’ve selected in-person.
00:01:30:03 - 00:01:38:04
I also have key attendees and staff so I can track the workload of my team and see if certain attendees draw larger crowds.
00:01:38:08 - 00:01:51:14
As you continue to create events in SwiftFox, you'll be able to see patterns in this information. So have a think about what event information would be most helpful for you.
00:01:51:18 - 00:02:03:43
Time to decide on my invite list, so I'll select a pre-existing mailing list. For example, new members list. You can also invite contacts who are not on the mailing list, such as your colleagues.
00:02:03:47 - 00:02:16:04
I'll invite my friend Tim. This page is going to become a lot more interesting when we have sent out our invites so we’ll come back here. Click next.
00:02:16:08 - 00:02:25:24
Now it's time to create your RSVP page, which contains your RSVP form. In events you can create multiple forms linked to the same event.
00:02:25:32 - 00:02:34:41
For example, I could create a website form, a sign up form a feedback form, but today I'm going to create an RSVP form.
00:02:34:45 - 00:02:41:22
So I'll click create RSVP page and write the page name “New Members Dinner”.
00:02:41:26 - 00:02:47:04
If you know how to use SwiftFox forms, this form will look familiar, but there are some exciting new tools here.
00:02:47:11 - 00:03:02:31
Let's add some text I'll also add an option to download a calendar invite so people can link this event to their calendars. So handy love when people do that, and style it to my liking.
00:03:02:35 - 00:03:08:20
Then we'll want to add in some RSVP buttons. To keep our form layout nice and clean.
00:03:08:21 - 00:03:20:41
I'll first add a column block to add these buttons to. Now I'll drag an RSVP button into the column and change the label to ‘Yes, I'll be there’. Style it to our liking.
00:03:20:45 - 00:03:28:14
Now we can just duplicate this button, move it over to the next column and set it to not attending.
00:03:28:18 - 00:03:31:25
Update the label to. No, not this time.
00:03:31:29 - 00:03:37:17
Now let's repeat this process for our final option that we'd like to include. Maybe
00:03:37:21 - 00:03:39:28
Now let's send the invite email.
00:03:39:32 - 00:03:49:10
Just like event forms, you can create multiple emails linked to your event for each stage of the event process. But let's just create an initial event email.
00:03:49:14 - 00:03:51:12
Let's name this email campaign.
00:03:51:12 - 00:03:52:40
“New Members Dinner”.
00:03:52:44 - 00:03:55:09
Next I'll choose an email category.
00:03:55:13 - 00:04:04:31
This email will be sent from a recipient's primary contact, so I will select this stakeholder leader toggle. Now let's just fill in some details.
00:04:04:35 - 00:04:10:45
Send rules will become useful when I'm sending follow up emails. But for now, I'll just leave this field empty.
00:04:11:00 - 00:04:14:04
The only thing left to add is the subject line.
00:04:14:08 - 00:04:22:28
So I'll go to my design builder, select the templates tab and then click on the template you want to use and click confirm.
00:04:22:32 - 00:04:25:40
Now let's start filling in my details.
00:04:25:44 - 00:04:40:11
I'll link my RSVP page change the label Style it to our liking. and add my social media links and I'll make sure to include an unsubscribe option.
00:04:40:15 - 00:04:47:17
Excellent. Now I'll send myself a test email. I can preview here how my email will look for different recipients.
00:04:47:21 - 00:04:56:21
Click next. send. Now it's out in the world. Fantastic.
00:04:56:25 - 00:05:04:24
This is where the event organising work starts. Now we need to attract attendees. So let's come back to the attendees table.
00:05:04:28 - 00:05:08:34
You can see everyone I've invited to the event in this attendee table.
00:05:08:38 - 00:05:15:49
I can also insert other custom filters here, such as who the stakeholder leader is, their contact details, etc.
00:05:16:03 - 00:05:21:47
And as people fill in their RSVP forms, this information will update automatically.
00:05:22:01 - 00:05:35:32
Let's point out a few interesting things by taking this auto mailbox here, everyone you add to your mailing list later will still receive this email before receiving any follow up emails. Pretty nifty.
00:05:35:36 - 00:05:39:46
My guest list is locked so I'm not going to select this option.
00:05:40:00 - 00:05:55:13
I can also update my invite statuses manually. So let's say Evan phones to say he is coming. I can update his status here and select attending while I'm on the phone. Same for a different RSVP response.
00:05:55:17 - 00:06:12:35
I can also filter by attendee RSVP. So here I have attending. Not attending, but I also have maybe and feedback provided. The last two ‘maybe’ and ‘feedback provided’, are event send rules.
00:06:12:39 - 00:06:20:25
Now send rules allows you to send emails to different groups within your mailing list based on their RSVP status
00:06:20:29 - 00:06:30:23
So I can create a ‘follow up’ email, ‘sorry we missed you’ email and send another email link to a survey asking how the event was.
00:06:30:27 - 00:06:45:24
Let's send an email to people who have responded maybe to my invite so I will duplicate my email, write some details. And unlike in my first email, I will select maybe from the events send rules option.
00:06:45:28 - 00:06:48:29
Okay, let's schedule and send
00:06:48:33 - 00:06:53:01
I can continue to create multiple emails and forms linked to this event.
00:06:53:05 - 00:07:01:31
But not all correspondence is sent via email. If you want a reply, sometimes you need to send people a message where they are, on their phones.
00:07:01:37 - 00:07:06:29
If you would like to send out SMS invites, this works much in the same way.
00:07:06:33 - 00:07:23:01
Select SMS. Then write your message in this nifty sidebar, “event is next Saturday RSVP to secure your place”. Select send rules. I want to track down the people who haven't replied and get an answer, select ‘No RSVP’.
00:07:23:05 - 00:07:36:34
In your message, be clear how your recipients can reply to your text. The responses are ‘Yes’, ‘Y’, ‘No’ or ‘N’ anything else and SwiftFox will not register the RSVP response.
00:07:36:38 - 00:07:41:33
Pick your date and time. Make sure you send this message at a time people are awake.
00:07:41:37 - 00:07:46:04
And very important, select your unsubscribe method.
00:07:46:08 - 00:07:57:49
Please note that the no unsubscribe method can only apply to certain messages and organisations, so please check the spam act. Then I'll click send.
00:07:58:03 - 00:08:05:43
Thank you for watching our speedy run through of how to create an event in SwiftFox and to see any more of our videos, just click next.
009-02 Design an Event RSVP Page
00:00:05:42 - 00:00:31:30
The Events feature is like a mini-campaign platform inside a campaign platform. There are so many exciting tools to use to make event organising simple; including forms. In this tutorial, I'm going to show you how to design an RSVP page for your event. This page will contain your RSVP form. Now, I'm starting this session today in the RSVP page section.
00:00:31:34 - 00:00:46:28
If you don't know how we got here, watch our "Create an Event" video. So, I'm going to click "Create RSVP Page" and I'll call it "New Members Dinner." Fantastic. Here we are in the RSVP form builder.
00:00:46:37 - 00:01:00:45
If you know how to use SwiftFox forms, this page will look pretty familiar. The RSVP page is in Events, just like our form feature, but we have a few extra tools that will make a big difference to event organisers.
00:01:01:07 - 00:01:26:46
But before I show you that, let's design our form. So, the first thing I'm going to do is set the layout of my form, and I'll do this by dragging a column onto the canvas. This will give you more flexibility with your formatting. Select the single column option. Now I can adjust the layout, padding, color, margin, or radius. And now I'll add an image to the header and upload.
00:01:27:00 - 00:01:49:21
Excellent. Let's add some text. Here, I'll add an "Add Update Contact" block. This will allow new contacts to sign up to my form. I can also add additional custom fields here by selecting "Fields" and adding fields here. I'll select "Dietary Requirements."
00:01:49:25 - 00:01:57:06
Now I want to ask some questions. Drag the "Question" block onto the canvas and use this dropdown menu to choose your question type..
00:01:57:06 - 00:02:21:23
Write your question and then choose whether your question is required for people filling in your form. If no description is needed, just leave that section blank. This question type creates a question that can have a range of possible answers, but the user may only select one option as their response. Click "Add Answer" to add an answer option.
00:02:21:27 - 00:02:45:05
You can add as many as you like. And just a note if you're a little confused about all the different question types, check out our video on question types. Let's add some of these new tools. Now I'll add an option to download a calendar invite so people can link this event to their calendars. So handy. Then I'll select RSVP and create some RSVP options.
00:02:45:09 - 00:03:08:44
Now I can change how this text appears for my recipients, so I'll change to "Yes, I'll be there" and style it to my liking, and "No" to "No, next time." But for my data it will just flow through as 'yes' and 'no.' I'll also add the option "Maybe." Great. Then I'll add a submit button and style it to my liking.
00:03:08:48 - 00:03:22:28
Excellent. I'll add a divider to break up the text. Customise our fonts and colors. Fantastic. Brilliant. You now have styled your RSVP page. What can't you do?
Masterclass: Form and Event RSVP templates
00:00:04:24 - 00:00:19:12
Hi everyone, and welcome to this week's SwiftFox Masterclass. Today we're looking at form templates, the ability to take a form you've already built and save it as a reusable starting point for every form that comes after it, including the RSVP pages you build for your events.
00:00:19:14 - 00:00:25:24
Most organisations don't build one form. They use dozens and a surprising number of variations of the same form.
00:00:25:24 - 00:00:52:46
An inquiry form, a join form, or an event RSVP. Each time somebody rebuilds the same contact block, sets the same matching fields, reapplies the same colours, fonts and logo, and hopes that nothing's been missed. It works, but it is slow. Two forms, built a month apart by two different people rarely end up looking or behaving the exact same way. So let's take a look at the form template as it is in SwiftFox, a template acts as a starting point when you build a new form.
00:00:52:46 - 00:01:12:46
When you use one SwiftFox copies its structure, blocks and styling into a new form, and from there, the new form is yours to change. A template can't enforce consistency after the fact. It's a way to make the consistent thing the easiest thing to do at the moment of creation, because creating a form from a template effectively clones it.
00:01:12:46 - 00:01:33:38
The two go their separate way from that moment. Changes you make to the template later don't propagate to the forms you've already built from it, which is worth knowing before you treat a template as a way to push changes across everything. Templates are made out of real forms. Rather than being authored separately. You can build a form, get it right, and then clone to a template.
00:01:33:40 - 00:01:53:18
To do that, you can open the three dot menu at the end of a row in your forms list and choose Set as Template. It'll ask you for a template name and save from then on, the template appears in your list with its type shown as standard template, which is how you can tell the templates apart from working forms at a glance.
00:01:53:24 - 00:02:20:08
Your original form is left exactly as it was, still live and still collecting submissions. The template is a completely separate record. It's worth separating this from clone, which sits directly above it in the exact same menu and does something different. Clone gives you a one off copy to work on. Set as template. Make something that's reusable appear in the create flow from then on. If you find yourself cloning the same form repeatedly, that's a signal that it should have been a template once.
00:02:20:08 - 00:02:34:40
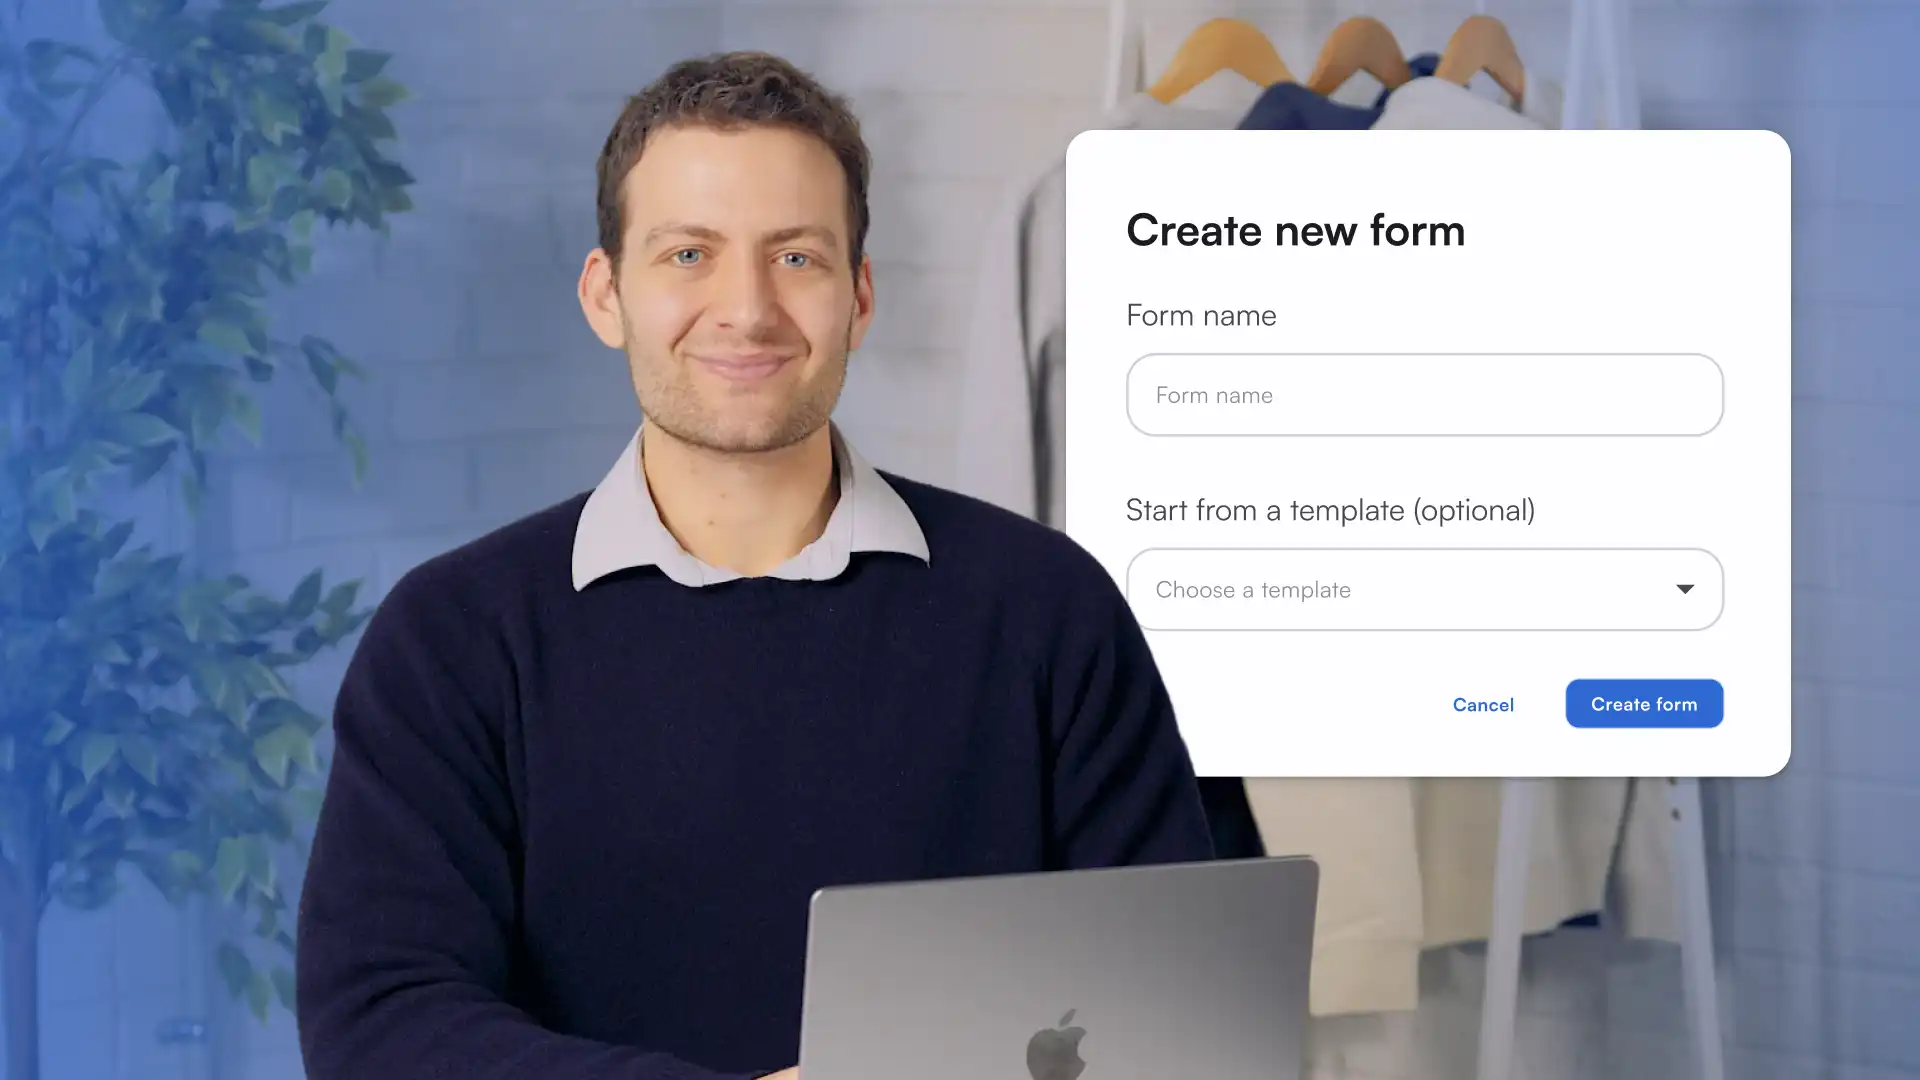
At least one template exists, the create flow changes when you create a new form. SwiftFox asks the form name as it always has, and beneath it you'll see an option “Start from a template” dropdown with all the templates available to you.
00:02:34:44 - 00:02:55:02
You choose one, select Create Form and SwiftFox builds a new form on that basis. From there, it's an ordinary form. You rename fields, adjust blocks, change the actions, and publish. Because the template is optional. Nothing changes if you don't want one. Start from blank is still there, and for one off forms, it's often the right choice.
00:02:55:04 - 00:03:17:34
For those organisations that use Circles. Templates belong to a circle where they were created in. The ones built in the circle we're working in appear at the top. Templates created elsewhere in your organisation appear below them. This is a considered design. It means a branch, a chapter, or a team can build templates that suit its own work without cluttering everyone else's create flow.
00:03:17:46 - 00:03:46:42
Events RSVPs is where these templates are most helpful. When you create an event and you're setting up an RSVP page, selecting create RSVP page opens a dialog that will look familiar, but with the same addition of the same “Start from a template” dropdown. What's different is what's inside it. The template offered there are only RSVP page templates, only your standard form templates won't appear, and your RSVP templates won't appear when you create an ordinary form.
00:03:47:02 - 00:04:12:14
This is because an RSVP page carries event specific behaviour that a general form has no use for, but it has practical consequences worth knowing. You can't build an RSVP template from your forms list. To create one you go into an event, build the RSVP page there and save that as a template or filter your forms list by Event RSVPs and save a previous one as a template.
00:04:12:26 - 00:04:30:28
A template is only as good as what you put into it. Include the fields you ask for every time first name, last name, and email which SwiftFox uses for matching, plus any custom fields you always need and set your styling once. As a rule of thumb, if you're doing the same thing to a third form in a row, it belongs in a template.
00:04:30:30 - 00:05:00:16
One pattern shows what RSVP templates can do beyond saving time. Many organisations run the same event in two places at once. A public RSVP page on the website that asks more, since it's meeting people who aren't yet in your database, and a member only version that lives in the portal that can ask for far less. Because RSVP templates are simply RSVP pages that you've saved, you can keep both and pick the right one when you build the event or add multiple.
00:05:00:20 - 00:05:20:02
The same logic applies beyond events, a short template for campaign capture and a long one for member applications, for a branded one for public forms, and a planar one for internal use. Templates are cheap, so make one per generally different job rather than compromising on a single template that half fits everything.
00:05:20:06 - 00:05:46:30
Form templates are a small feature with a compounding return. Every form built from a good template starts correct, looks right, and matches to the right person without anyone having to remember how. If you're starting out, don't try to design the perfect template upfront. Take the form your organisation already uses most, the one you'd point to as a good example, and save it as a template. That action will improve the next form you build and everyone after it.
00:05:46:32 - 00:05:50:28
Thank you for joining us for this SwiftFox Masterclass, and we'll see you in the next one.
09-11 Event sessions
00:00:04:04 - 00:00:27:02
Quizzes, points, glory! Today we're taking an existing form and turning it into a scored quiz with live progress and a clear pass outcome. Let's say you've just updated your workplace safety policy, and you need to make sure your team has actually read and understood the new guidelines. A scored quiz is the perfect way to track comprehension while keeping things engaging.
00:00:27:14 - 00:00:49:26
Here we have an existing form that covers our new safety policy. I want to convert it into a quiz to test team members on some recent policy updates that are critical for them to understand. To get started, select a question in your form and toggle on Enable Points. This transforms your regular question into a scored question.
00:00:49:28 - 00:00:59:06
Next, head into the answer list. Select the three dot menu beside each answer and assign the number of points you want to give for correct responses.
00:00:59:08 - 00:01:13:02
For our safety policy quiz, I'll give five points for the correct answer about fire exit procedures and zero points for the incorrect options. This way, team members who choose the right answer will earn points towards their final score.
00:01:13:10 - 00:01:26:02
Here's something to keep in mind with number based questions. The value your respondent enters will become their point value. So when you're setting up these questions, think carefully about the weight you want to give them.
00:01:26:06 - 00:01:43:08
Make sure you've set an appropriate maximum value so someone can't accidentally score a thousand points by entering a really enthusiastic number. Once you've added all your questions and you're happy with your point allocations, navigate to the final page of your form.
00:01:43:12 - 00:02:01:20
Here you can add the points block, which will display the respondents final score when they submit. It's incredibly satisfying for participants to see their total pop up at the end. Every submission automatically stores the total score with the response, which means you don't need to do any manual calculation.
00:02:01:22 - 00:02:13:37
To review how someone performed. Open feed and select full details on their submission. You'll see their score right there, and you can leave a comment or even create a follow up task if needed.
00:02:13:45 - 00:02:38:24
The real power comes when you use these scores in automations or follow up communications. For instance, if someone scores below your past threshold on the safety quiz, you could trigger an automatic email suggesting that they review the policy document again. Or, if they ace it, send them a congratulatory message. No spreadsheets, no manual tracking, just intelligent automation based on their performance.
00:02:38:30 - 00:02:55:40
You've successfully upgraded a standard form into a scored quiz with live feedback. Set your past threshold, add clear success messages for different score ranges, and you're ready to publish your quiz. For more lessons on forms. Check out the rest of our videos in the Academy.
Tickets, Capacity & Table Bookings

009-08 Create ticketed events
00:00:05:29 - 00:00:32:31
Ready to see how easy it is to create ticketed events in SwiftFox? Whether it's a cozy gathering or a full blown conference, SwiftFox has you covered. Organising, selling tickets and tracking attendees like a pro. Let's dive in and get your event rolling. Head over to Events and create a new event. Entering the relevant event details. Under the settings, select Enable Tickets.
00:00:32:35 - 00:00:55:34
Now you will see a new step in the event stepper up called Tickets. Select next. Let's get started creating our tickets. First select new ticket. Give your ticket a name., set a price, and set a capacity for the number of tickets in this category that you wish to sell. Optionally, you can add a ticket description if you are using invoicing for your tickets.
00:00:55:35 - 00:01:21:42
You can add all the relevant invoice details in the financial settings. This includes item codes, account codes, and tax rates. The final step is to select Save Ticket. You can add an unlimited amount of additional ticket types by repeating these steps. Selecting next will take us to our invite list. We'll add our list and select next. Now let's start selling our tickets.
00:01:21:46 - 00:01:44:23
And for that we need to create an RSVP page. Select Create RSVP page and give it a name and create. Now to sell these tickets, there are a few essential blocks we will need to drag into our form. Firstly, the tickets block. Drag this block into your form and set the ticket types you want to make available for the form.
00:01:44:27 - 00:02:08:34
You can select one or more of your created tickets. The second block you will need to drag in is the payment method block. This will create the options for how your attendees will purchase their tickets. Select the payment provider to set the type of payment you will be offering. For this feature, you will need to have your payment provider integrated with SwiftFox, which your account managers can help you set up.
00:02:08:37 - 00:02:36:21
For this example, we will allow our attendees to pay either by credit card or invoice. When selecting invoicing, you can either integrate it with your invoicing provider, such as zero, or you can create an invoice directly from SwiftFox by putting in a reference and a due date. Once you've selected your payment options, click done. Now your audience can start buying tickets, so send out your invites or place your form on your website.
00:02:36:25 - 00:03:03:27
Once an attendee enters their details, they can select the ticket type they wish to purchase and the amount they can then select how they wish to pay. In this tutorial, we will use a credit card. Your attendees have now successfully purchased a ticket to see who has purchased a ticket. Head back into SwiftFox Events. In the invite list table, you can see who is both attending what tickets they purchased and their payment status.
00:03:03:31 - 00:03:27:35
You can also see additional ticket data by heading back to the ticket step, where you can view how many tickets have been purchased for each ticket category, who has purchased them, and how many are left. The ticket details will also appear on your purchases profile page. Click on their financial tab and you will see both the receipt and the ticket information for the event itself.
00:03:27:39 - 00:03:52:05
And that's it. You've now seen how easy it is to create and manage ticketed events in SwiftFox. From setting up tickets to tracking payments and attendees. SwiftFox provides a seamless experience for event organisers. Whether you're using credit card payments or invoicing, you've got the tools to handle everything in one place. Thanks for following along and happy event planning.

009-07 Set event capacity and waitlists
00:00:05:32 - 00:00:33:00
Overcrowded events are bad but under catered? That's a tragedy no snack can fix. Let's avoid that. Today we'll show you how to set capacity limits for your events and enable a waitlist in SwiftFox This feature ensures your events don't get oversubscribed while still giving attendees a chance to join the waitlist if your event is full. Let's jump straight in and get started.
00:00:33:04 - 00:01:02:49
To get started. Head to events and Create New Event. We've covered the event details in previous lessons, so we'll skip over that here. And when you reach the settings, you will see the capacity. Toggle this on and set your limit. Next, toggle the waitlist on and set a limit for the waitlist. You can also add a custom message to people registering for the waitlist by selecting the checkbox.
00:01:03:03 - 00:01:24:40
Now you have set both a capacity limit and a waitlist for your event. Once your event is at capacity, anyone who tries to register will be greeted with a message saying the event is full and encouraging them to register for the waitlist. Registering will then show your custom message. You can see who is on your waitlist in the invite list table back in Events.
00:01:26:15 - 00:01:50:49
Anyone that has registered for your waitlist will appear in the white list in the Invite Status column. You can also filter this column to just show people on the waitlist. And that's it. You now know how to set capacity limits and manage a waitlist for your events in SwiftFox. It's a simple way to make sure your events run smoothly and don't exceed their maximum capacity.
00:01:51:03 - 00:01:53:36
Thanks for following along and happy event planning!

009-09 Group book tables
00:00:04:06 - 00:00:24:45
Group bookings. The unsung hero of event management. Whether you're organising a wedding where Uncle Bob insists on sitting with all of his golfing buddies, or planning a corporate dinner where the marketing team must absolutely not, under any circumstances, be seated near the sales team. Group bookings are here to save the day.
00:00:24:49 - 00:00:41:49
Let me walk you through a real example. Last month, I helped organize the Tech Association's annual charity gala. We needed to manage tables of ten, with some corporations booking entire tables and others just booking a couple of seats. Here's how SwiftFox made it seamless.
00:00:42:03 - 00:00:54:17
First, let's create our event with group booking capabilities. Open your event as usual, filling in the essentials name, date and that perfect venue you spent weeks finding.
00:00:54:21 - 00:01:07:22
In the settings section, you'll enable tickets. If you're working with limited space like our Gala's cozy 200 person venue, set your capacity limit and consider adding a waitlist.
00:01:07:26 - 00:01:22:31
Now for the exciting part the tickets tab. Select New Ticket and you'll see two options; general ticket for those solo party goers and group ticket perfect for our table bookings. Choose Group ticket and let's set it up.
00:01:22:35 - 00:01:49:34
Name your ticket. We went with “Table of 10 - Corporate Sponsor”. Set the price as was $1500 per table. Choose how many tables are available and most importantly, set the group size. This is your table capacity. For us it was 10 seats per booking. You'll also find the usual criteria and financial settings. If you want to restrict who can purchase these tickets and how your tax and accounting is set up.
00:01:49:38 - 00:02:01:33
After hitting save, your group ticket is ready to roll. You can always tweak things later using the three dot menu because let's face it, event planning is like jazz. It's all about improvisation.
00:02:01:37 - 00:02:09:46
Create your RSVP page and event emails as usual. Making sure to showcase your shiny new group ticket option in the tickets block.
00:02:10:08 - 00:02:22:34
Once bookings start flowing in, the invite List tab becomes your best friend. Here you'll see the table purchaser, in our case mostly corporate sponsors and all the named attendees who've confirmed their seats.
00:02:22:46 - 00:02:30:42
Pro-tip: Those empty seats in group bookings won't show up here. They like ninjas, invisible, but taking up space.
00:02:30:46 - 00:02:51:03
For a full picture check the bookings tab. This shows every transaction and lets you see how many seats each booking includes, and add attendee names as they come in. Because someone always waits until the last minute. Just fill in the details and hit save and close. These names will magically appear in your invite list.
00:02:51:07 - 00:02:59:17
Quick recap for those playing along at home. Invite list your confirmed guest roster and bookings, the money trail and seat count.
00:02:59:29 - 00:03:11:13
And there you have it. Group bookings in SwiftFox, making event organisers lives easier. One table at a time. No spreadsheet juggling or midnight panic attacks about seating arrangements.
00:03:11:17 - 00:03:21:28
Thanks for watching. If you need me, I'll be helping Uncle Bob find his table. Don't forget to check out our other SwiftFox Academy lessons. They’re like this one, but with different buttons to click.
Spotlight: Group Event tickets
00:00:00:07 - 00:00:13:12
Hey everyone, it's Olivia from SwiftFox. Today we're going to explore a new group ticket feature in SwiftFox Events that makes managing multi-person bookings easier than ever. Let's jump right in and take a look.
00:00:13:16 - 00:00:27:42
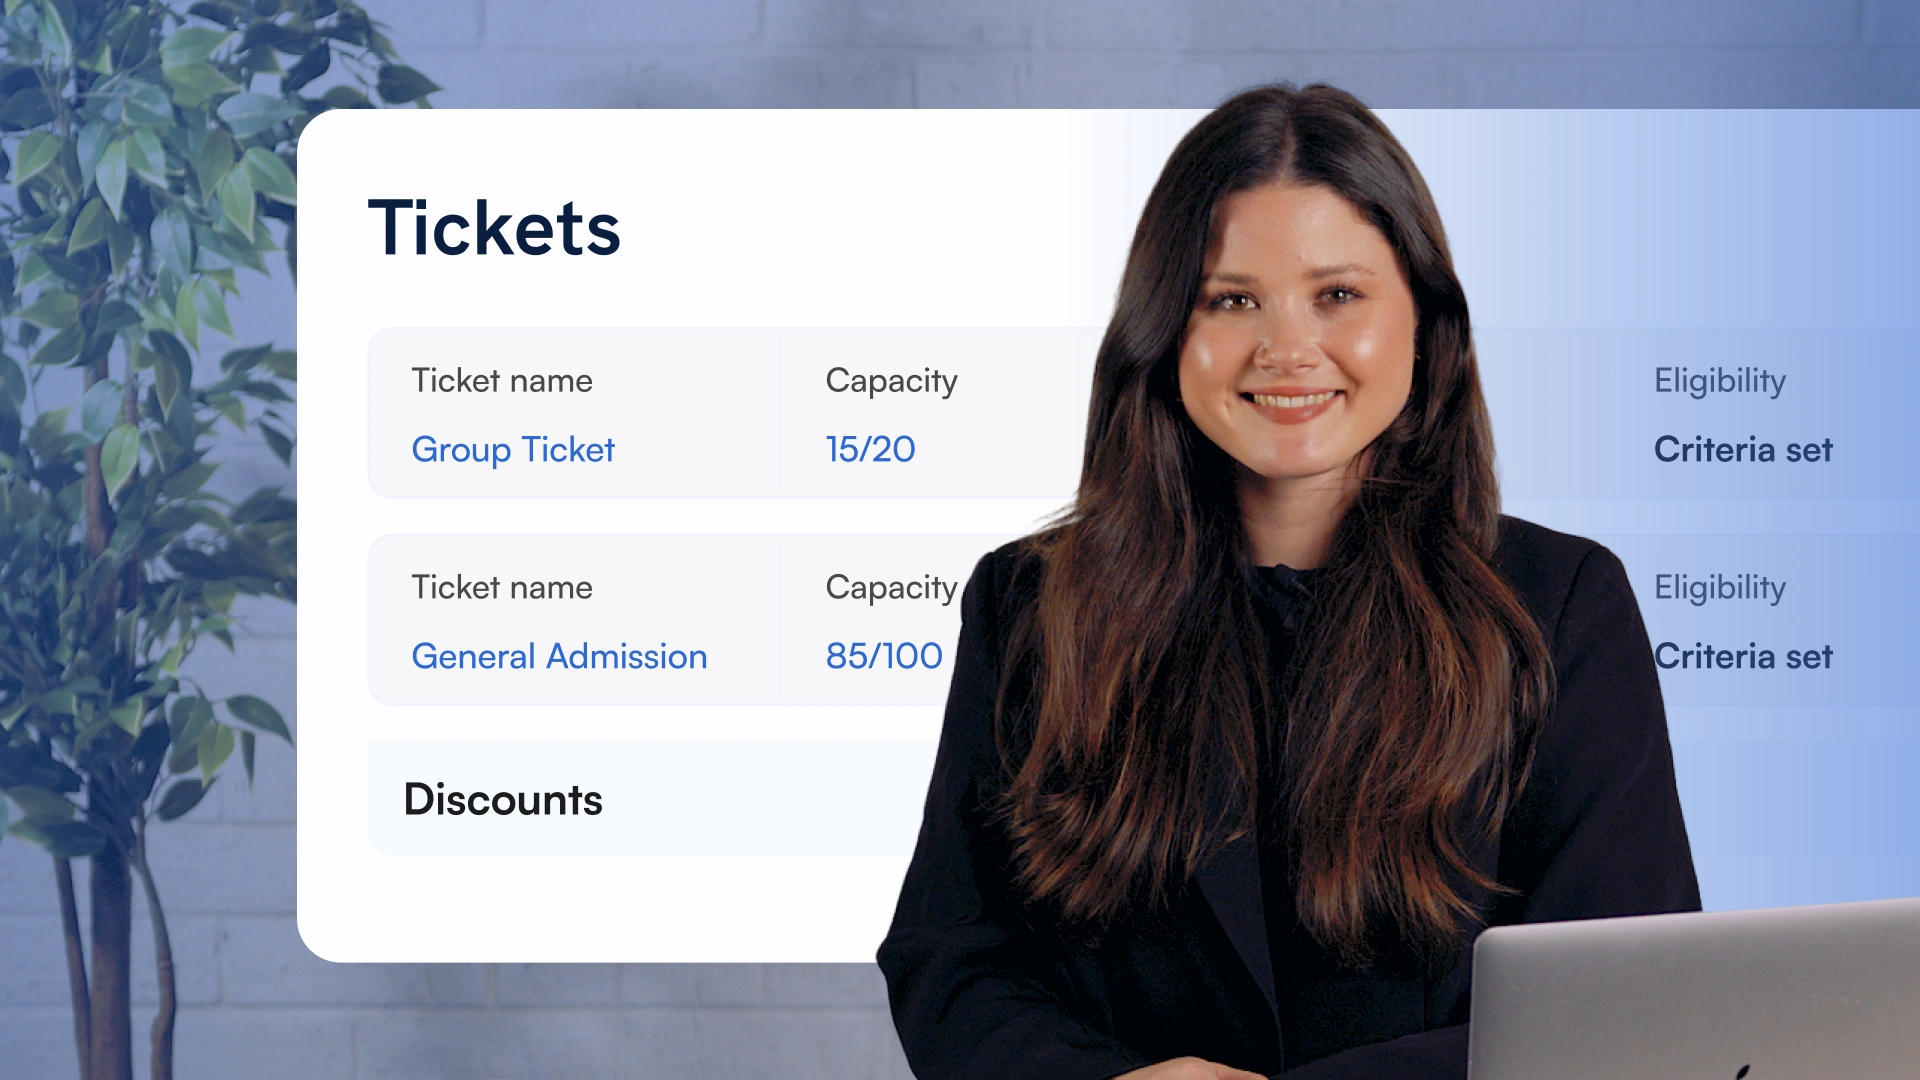
When setting up tickets for your event, you'll now see two options; general tickets and group tickets. Selecting Group ticket reveals a new field for group size. This determines how many seats can be purchased under a single ticket.
00:00:27:46 - 00:00:38:19
Simply set your group size, then configure standard options like ticket name, price, capacity, description criteria and financial settings.
00:00:38:23 - 00:00:54:20
After sending invitations, you can track and group ticket purchases in the invite section under the bookings tab. Here you see all purchased group tickets and their payment status. You can edit each group booking to individually assigned seats and update their status.
00:00:54:24 - 00:01:05:04
If you add someone to a ticket who wasn't on the original invite list, they'll be automatically added to the invite, allowing you to track their participation and send them email and SMS updates.
00:01:05:08 - 00:01:12:11
This streamlined system ensures you can easily manage large group bookings while maintaining accurate attendee records.
00:01:12:15 - 00:01:20:11
Want to simplify how you manage group bookings? Our new Group ticket feature is ready for you to explore visits SwiftFox today to discover how it works.
00:01:20:15 - 00:01:24:13
Need more guidance? Check out our detailed tutorials in the SwiftFox Academy.

016-03 Taking payments through Forms
00:00:05:05 - 00:00:28:49
Today we're going to walk you through how to take payments from your contacts using SwiftFox forms. These forms can be used for a wide variety of purposes, including join forms to sign up your members, donors, or subscribers, selling tickets to pay events you may run, donate pages to allow you to raise funds, or even selling merchandise or goods.
00:00:29:03 - 00:00:55:25
To understand how to create a form, check out our comprehensive video on creating a new form in the SwiftFox Academy. If you already know how to create a form, let's show you now how to take payments. To get started, let's head over to forms and in this video we'll bring up a form that we prepared earlier. First, let's drag onto the canvas and add or update contact block so we can capture the details of the person.
00:00:55:29 - 00:01:22:25
Now let's drag the transaction block. On the right hand side. You can now edit the transaction block. Give the transaction a name and select from the drop down the type of payment this will appear as in SwiftFox. The dropdown contains all your predefined payment types. Next, let's set the dollar amount. We have some prefilled values here, but you can either edit, add or remove any of these amounts.
00:01:22:29 - 00:01:45:24
These are the amounts that you will be asking of the prospect filling out the form. For example, if this is a donate form, you may wish to add multiple amounts. The next step is to set the payment method you wish to provide. To do this, drag the payment method block to the canvas and now on the right hand side, select the payment options you will provide on the form.
00:01:45:28 - 00:02:09:41
The options in this dropdown will be the payment methods you have previously set up in SwiftFox and connect to your payment gateway. And before we finish one final option that may be relevant to your organisation. Let's set up payments for memberships or subscriptions. To do this, dragging the subscription block to the canvas and then edit the settings on the right hand side.
00:02:09:45 - 00:02:34:46
Select the plans you want the form to display by using the dropdown. You can select one or multiple. You can also set the subscription to automatically renew by enabling the default to auto renew checkbox, or you can give the prospect the option to choose auto renew for themselves. Finally, you can also override the default labels SwiftFox has set to tailor the form to your organisation.
00:02:35:00 - 00:03:01:25
Now, your subscription on your form is all set up. Make sure you select the preferred payment methods you will be offering to your prospects by undertaking the steps outlined earlier in this video. We understand setting up payment forms can sometimes be a little nerve wracking given it's dealing with revenue, so our team typically help you set up all your initial payment forms when you get started with Swift Fox, and we then provide detailed training.
00:03:01:29 - 00:03:10:28
I hope this video has served as a refresher, and if at any time you need extra assistance, be sure to contact our team directly and we'd be more than happy to help.
Invitations, Reminders & Follow-Up

009-03 Email Event Invitations
00:00:05:45 - 00:00:21:27
Do you know my favorite proverb? “A great event needs a great email”. In this tutorial, let me show you how to create a great event email with the SwiftFox Email Builder.
00:00:21:31 - 00:00:41:05
Here we are in the SwiftFox Email/SMS part of the Event Builder. You can create multiple emails linked to a single event. For example your follow up email, your thanks for coming email or like this one your invite email. So let's create that now, click create new email.
00:00:41:09 - 00:00:46:31
This campaign name is just for internal use. Next I'll choose an email category.
00:00:46:35 - 00:01:01:34
Decide who you will send this from, Is it from a primary stakeholder later or is it from you? And decide where you will receive replies let's write the subject line and write the preview text. and workout send rules.
00:01:01:38 - 00:01:18:45
Send rules allows you to send the email to segments of your invitation list, for example, to people who have RSVP yes or no. But we're sending out the first invite, so we'll leave this section blank.
00:01:18:49 - 00:01:32:08
Let's get into the design features. Now, if you know how to use SwiftFox emails, this will look very familiar to you. Events uses SwiftFox emails, but there are a few extra useful features.
00:01:32:12 - 00:01:41:42
On the right you'll see your SwiftFox design toolbar filled with great design options. I could use a saved template here, but today it's all about creation.
00:01:41:47 - 00:01:48:25
In the style section, you can tweak the body background color, so I’ll tweak the colours to fit with my brand colours.
00:01:48:37 - 00:02:01:39
If you put all your elements inside a single column block, this will give you more flexibility with your formatting. So we'll take a column block here and drag this onto the canvas select the single column option.
00:02:01:43 - 00:02:10:38
Now I can adjust the layout, padding, colour margin or radius. Okay, great. Now we have a great looking frame for our email.
00:02:10:42 - 00:02:26:47
I'm going to add two image headers first. Drag the first image block onto the column block and upload. Same as before, play around with the columns padding to position the image. Now repeat.
00:02:27:01 - 00:02:31:25
Let's write your email. I'll add the rich text blog to my email design.
00:02:31:29 - 00:02:41:41
And because I'm known to get writer's block, I'll use this Swift predict icon and ask Swift predict to write this invitation to a new member dinner.
00:02:41:45 - 00:02:52:15
I'll then edit the text here to make it my own. I'll add a merge field, to summon a merge field I'll write the @ symbol and I can see my list of options here.
00:02:52:19 - 00:03:09:19
I'll select at first name and I'll create a fallback just in case. I'll adjust the font of my email by selecting the font and colour here. Now let's get to some of those specific event features.
00:03:09:23 - 00:03:31:12
Here you can see event location which will link your event to Google Maps. This is already in my RSVP form so I won't bother adding this here. I'll also add an option to download a calendar invite so people can link this event to their calendars, and I'll link my RSVP form via RSVP link. Style the button.
00:03:31:16 - 00:03:47:04
Now it's time to test. Okay, let's preview our email. First, I want to see how my email will look if in an unexpected turn, we don't have a first name for our invitees.
00:03:47:08 - 00:03:49:31
Great the fall backs are working.
00:03:49:35 - 00:04:05:09
You can send a test email to anyone on your contact list, and as with before, you can select any profile in this scroll bar. I'll send myself an email, but I want to see how it looks for my new member, Jane. With her mail merge fields filled in.
00:04:05:13 - 00:04:20:23
So let's schedule and send. Once your invitations are sent, you can create multiple emails linked to your event and to copy your email, simply click clone and options will appear.
00:04:20:27 - 00:04:21:31
Thanks for tuning in.

009-05 Event Send Rules
00:00:05:32 - 00:00:23:28
Event Send Rules are one of the best tech gifts of the universe. They can help you segment your lists, write tailored emails, and finalise your event invite list faster. In this tutorial, you guessed it, let's learn how to create event send rules, and how to use them.
00:00:23:32 - 00:00:30:27
So to create events send rules, you must be the most elite SwiftFox user there is: an admin.
00:00:30:31 - 00:00:39:15
I see you've stayed. Nice to know I'm with such distinguished company. Let's dive in.
00:00:39:19 - 00:01:05:05
Head over to Settings and then select Event RSVP Options. Now the first four event statuses allow SwiftFox to have zoom data funneled into SwiftFox. So if you have a Zoom event linked to SwiftFox, you'll be able to see who attended, and who didn't attend, etc. Let's focus on this customisable section: Event Send Rules.
00:01:05:09 - 00:01:23:25
This is where you create what information you will track on your events. Now organisations like to track event data differently. You might want an RSVP response for attendees who have RSVP'd but not paid, or for people who have provided feedback or marked 'maybe' for an event.
00:01:23:29 - 00:01:32:13
This information can then be used to send follow-up emails, assess event performance, and add to the rich data on individuals.
00:01:32:17 - 00:01:40:25
Decide what would be most helpful for you. Okay, let's move on.
00:01:40:29 - 00:01:55:13
Event Send Rules are incredibly useful when it comes to managing event RSVPs. I'll set the scene. I've sent my event invitations and received some RSVP responses, but I still need to finalise my event list.
00:01:55:17 - 00:02:07:10
I can get a quick visual by going to my invite list, filter by 'maybe' responses, which is one of our custom event send rules, but you can filter by any send rules here.
00:02:07:14 - 00:02:29:05
Now what is even more useful is that I can send tailored emails to different groups within my mailing list, based on their RSVP status. In my event under email, you can see I have already sent out an email invite. This was sent to everyone on my event mailing list. Let's create a second email that will be sent only to people who have RSVP'd maybe.
00:02:29:11 - 00:02:45:32
So I'll create a new email, fill in the details, and select 'maybe' for event send rules. Great, that's been scheduled and set. Now I can keep creating tailored emails for different attendee groups.
00:02:45:36 - 00:02:56:43
For example, I can send a thank-you email to everyone who has provided feedback or I can send a "Sorry, we missed you" message for people who selected attending but didn't actually attend.
00:02:56:47 - 00:03:09:04
It's up to you, and you can clone your event email. Simply click clone and options will appear. Thanks for watching! To watch any more of our feature videos, click below too.

009-06 SMS Event Reminders
00:00:11:21 - 00:00:17:02
I'm sorry. I was just replying to an event RSVP from SwiftFox via SMS.
00:00:17:06 - 00:00:25:23
Now, that was just a simple theatrical device used by people in the biz such as myself to illustrate a point. And that point is this.
00:00:25:35 - 00:00:40:00
If you want to find someone, you have to go where they are and where they are is on their phone. In this tutorial, I'll show you how to send an RSVP response via SMS.
00:00:40:04 - 00:00:51:49
Here I am in the event builder. I'm at the Email/SMS stage. Now I've already sent out my invitations, but I'm still waiting on some answers and now I need some replies. So what do I do?
00:00:52:03 - 00:01:08:21
Select SMS, then write your message in this nifty sidebar. Event is next Saturday RSVP to secure your place, select send rules, I want to track down the people who haven't replied and get an answer. Select no RSVP.
00:01:08:25 - 00:01:22:04
In your message be clear how your recipients can reply to your text. The responses are ‘Yes’, ‘Y’, ‘No’ or ‘N’ anything else and SwiftFox will not register the RSVP response.
00:01:22:08 - 00:01:30:37
Pick your date and time, make sure you send this message at a time, people are awake.
00:01:30:41 - 00:01:39:03
Select an unsubscribe method, do not choose no unsubscribe method unless you’re sure you're not in breach of the spam act.
00:01:39:07 - 00:01:42:40
Check the spam act to determine this. Do not guess.
00:01:43:00 - 00:01:48:04
Then I'll click send.
00:01:48:08 - 00:01:52:22
You can see the responses filing in. Look at this beautiful list.
00:01:52:34 - 00:02:03:18
Now you're going to work out your attendee list today because all your guests had to do was just look at their phone, feel flattered by the attention, and write a simple yes or y
00:02:03:22 - 00:02:08:13
To see more information on how to create great events, check out our videos below
00:02:08:22 - 00:02:12:11
Thanks for tuning in and if you have any feedback, send us a text

009-04 Manage a Zoom Event
00:00:05:48 - 00:00:19:30
In this digital age, our events don't need to be confined to the physical realm. They can go online! Whether you're organising a webinar, a conference, or even a slightly weird visual dinner party, online events are a must.
00:00:19:34 - 00:00:30:36
Let's dive into how you can create an online event in SwiftFox with our Zoom integration. Let's get into the events Builder.
00:00:30:40 - 00:00:43:46
First, let's create an event. Write your event name and description, I'll write mine here. Now let's set the date and time. Don't forget to include the end time as well.
00:00:44:00 - 00:01:01:34
Let's set the location. Since this is an online event for the location, I'll choose online. Then if I'm creating this zoom event fresh in SwiftFox, I'll select Create Zoom Webinar There it's created!
00:01:01:38 - 00:01:20:36
What if you've already created an event in Zoom? It's almost as easy. Go to your Zoom account, copy your Webinar ID then return to SwiftFox and paste your information in. Brilliant!
00:01:20:40 - 00:01:28:49
If you're running your event both in-person and online, you can select the hybrid option. Enter your physical address for the in-person part.
00:01:29:09 - 00:01:35:20
Then either insert your Zoom details or select the Create Zoom Webinar
00:01:35:24 - 00:01:52:24
So versatile. Let's breeze through the remaining steps of the event creation process. I'll add my mailing list, design my RSVP form, send my email invitations and create my event. Amazing.
00:01:52:35 - 00:02:04:47
With the event set, RSVP will funnel into the attendee table. And just like with an in-person event, I can send emails and SMS messages based off attendees RSVP’s.
00:02:05:01 - 00:02:12:22
After the event wraps up, attendance data will sync from Zoom to SwiftFox, so you can see results easily. How good’s that.
00:02:12:29 - 00:02:19:48
Thanks for tuning in. There's so much more you can explore with events. Be sure to check out our other tutorials for more tips and tricks.

009-10 Add people to a new event using calls
00:00:04:05 - 00:00:19:21
You've got a list of potential event attendees longer than your tax return, and you're wondering how to get them all excited about your upcoming shindig. Well, grab your headset, because we're about to turn those cold calls into warm connections.
00:00:19:25 - 00:00:29:22
Today we're showing you how to transform your contact list into an enthusiastic crowd using SwiftFox Calls, the personal touch that makes all the difference.
00:00:29:26 - 00:00:50:21
So why would you use this? Well, let's say you've carefully curated a list of 1000 people who would be perfect for your event. Maybe they're local business leaders, longtime members, or folks who’ve shown interest in similar events before. Instead of letting your invitation get lost in a crowded inbox. You can create a personal connection with a friendly call.
00:00:50:32 - 00:00:59:44
Using SwiftFox Calls, you can have meaningful conversations that not only boost attendance, but also build stronger relationships. Let's dive into how.
00:00:59:48 - 00:01:09:20
First stop on our journey, the List Builder. Here you can either create a fresh list or use one you've already saved. Think of it as your guest wish list.
00:01:09:24 - 00:01:23:13
Before you start dialling, let's prepare your conversation roadmap in the form of a SwiftFox Form. Head to the form section and create a new form. Let's call it Event Check. Add your talking points and conversation flow.
00:01:23:17 - 00:01:29:28
Remember, this is just for your callers. No need for fancy buttons or RSVP mechanisms here.
00:01:29:32 - 00:01:39:48
When you're happy with your script, select Save and Close. Now let's head to SwiftFox Calls and select Create Call List. Give your call list a memorable name.
00:01:40:02 - 00:01:54:11
Choose your form as your survey. This becomes your conversation guide. Select next, then pick your saved list. Confirm and you're ready to start spreading the word. Hit that call button and let the conversations begin.
00:01:54:15 - 00:02:00:41
For each person you reach, your script will be right there on the screen. No more awkward ums and ahs.
00:02:00:45 - 00:02:14:36
If they haven't been invited yet select Add to event. Choose the events you want to invite them to set their RSVP status and they'll automatically appear on your event's invite list, like magic but with better organisation.
00:02:14:42 - 00:02:21:42
Once you've wrapped up mark, the call is completed. Select Next Record to move to your next potential guest.
00:02:21:46 - 00:02:34:40
And there you have it. You're now equipped to turn your contact list into a lively guest list. One conversation at a time. Before you know it, you'll have a room full of engaged attendees who all remember that friendly call that got them there.
After the Event
Masterclass: Cancel and refund event bookings
00:00:04:02 - 00:00:22:08
Hi everyone, and welcome to this SwiftFox Masterclass. Today we're looking at how to manage event bookings once they've been made and in particular how to handle the moment every event organiser knows is coming – when plans change and you need to remove an attendee, cancel a ticket or unwind an entire booking.
00:00:22:10 - 00:00:44:28
Instead of going through step by step, this session will focus on the mental model behind bookings and tickets because once that's clear, the cancellation options stop feeling like a row of buttons and start making sense as a system. By the end, you'll know where to go, which action to reach for, and just as importantly, what each action does and doesn't do.
00:00:44:32 - 00:01:10:10
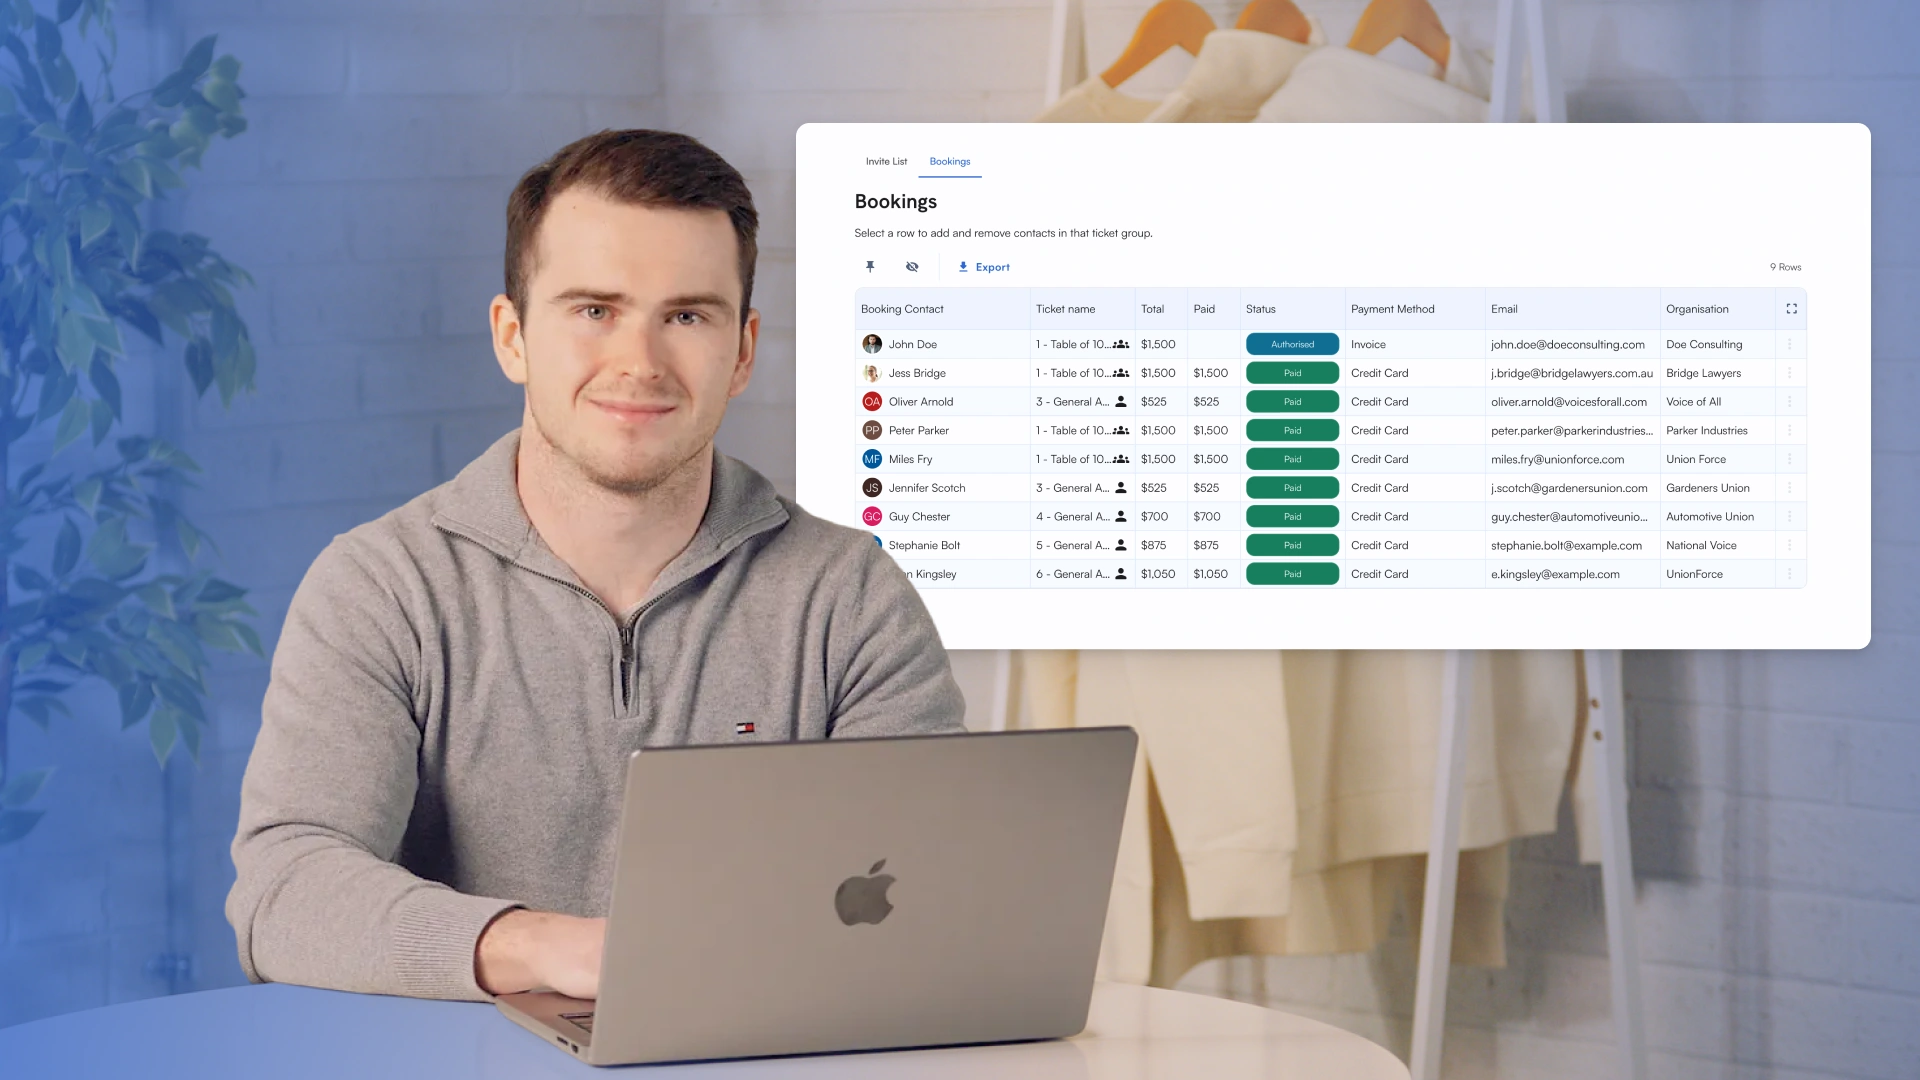
Every time someone buys a ticket to your event, SwiftFox records our purchase in two places at once. It creates the underlying tickets, and it groups them into a booking, the single transaction that ties those tickets together. You'll find both views inside the invite list step of your event. In the two tabs at the top left of the page, the Invite list tab is your confirmed guest roster, the named people who are actually coming.
00:01:10:22 - 00:01:20:26
The bookings tab is the transaction view, every purchase, how many tickets it includes, and its current status, whether that's paid, pending payment, or canceled.
00:01:20:30 - 00:01:30:16
When you're making changes, the bookings tab is your home base. It's where you can see the full shape of a purchase and where all of the cancellation controls live.
00:01:30:22 - 00:01:44:34
Not all bookings behave the same way, and the difference comes down to what a ticket actually is. Look at the small icon next to each booking. A single person icon is a general admission booking a stack of individual tickets that someone bought in one go.
00:01:44:42 - 00:02:03:14
A multi-person icon is a group booking or table, a single block of seats sold as one unit, where each seat is simply a place you assign a name to. The distinction matters because of what sits underneath. In a general admission, booking each ticket is its own thing, so you can act on them one at a time.
00:02:03:26 - 00:02:23:12
In a group booking the seats aren't separate tickets, they're allocations within one larger ticket. You can decide who sits in each seat, but the seats themselves can't be peeled off individually. This is why the two bookings give you different options when you open them, and why it's worth recognising which one you're working with before you start.
00:02:23:24 - 00:02:31:24
When you open a general admission booking, you'll see each ticket listed with its own ticket status and a cancel booking button at the top.
00:02:31:28 - 00:03:09:26
Each row has an action menu offering two choices Remove person, which clears the name from a ticket but keeps the ticket itself, useful for when an attendee drops out and you intend to give their place to someone else. Cancel ticket goes a step further and cancels that single ticket outright. That's the right tool when, say, one person from a group of four genuinely can't attend and you want their ticket gone rather than reassigned. If the whole purchase needs to be undone, the Cancel booking button cancels every ticket under that booking in one action, so a single purchase of four tickets is cleared in one step rather than four.
00:03:09:30 - 00:03:23:46
Group bookings work differently, when you open a table booking, you'll see every seat, but you're only per seat option is remove person. Removing a person frees their place and the seat stays with the table ready for the next name.
00:03:24:06 - 00:03:48:02
A table is sold as a fixed block. A table for ten exists as ten seats, or it doesn't exist at all. You can't quietly shrink it to nine. So if a table genuinely needs to go, you cancel the whole thing. Open that bookings menu in the bookings list and choose Cancel booking. In short, with a table you can move people in and out freely, but the table itself is all or nothing.
00:03:48:06 - 00:04:18:14
There's one more thing to understand clearly because it affects your accounting. Canceling a ticket or a booking does exactly one thing automatically. It frees up the capacity the seat is released and your events numbers update so your remaining availability stays accurate. What it does not do is move any money. Canceling never triggers an automatic refund or credit, and it doesn't alter the original receipt. SwiftFox will prompt you with a reminder that any refund needs to be handled manually.
00:04:18:18 - 00:04:36:04
It keeps you in control of exactly what's returned to whom and when, rather than making a financial decision on your behalf. The practical takeaway is to treat the cancellation as two separate steps; cancel in the bookings tab to free the seat, then process the refund yourself.
00:04:36:08 - 00:05:00:02
So to bring it together, the bookings tab is where you manage change and the key is knowing whether you're holding a general admission booking, where tickets can be canceled one by one, or a group booking where seats can be reassigned but the table stands or falls as a whole, whichever you're working with. Remember that canceling frees the seat, but never the money. Refunds remain a deliberate manual step.
00:05:00:12 - 00:05:15:18
If you're getting started, the simplest thing you can do is open a recent event, switch to the bookings tab and look at the icons. Once you can tell general admissions and group bookings apart at a glance, the right action follows naturally.
00:05:15:22 - 00:05:21:32
Thank you for joining this masterclass. As always, if you have any questions, your SwiftFox account team is on hand to help.

016-06 Refund a payment in SwiftFox
00:00:04:41 - 00:00:28:01
Today we're going to show you how easy it is to refund payments to your contacts in SwiftFox. To get started, let's bring up a contacts profile. Here you will see the financial tab. Now this tab will only be displayed if you have the SwiftFox Finance feature. Scroll down to the receipts table. Here you will see the full transaction history of your contact.
00:00:28:05 - 00:00:52:49
This table shows you the date of the transaction, the receipt number, the payment amount, the method of payment, and the status of that transaction. If your transaction was initially successful, however, your contact has now requested a refund. You can do so in these easy steps. First, identify the transaction you wish to refund and make sure it was a success.
00:00:53:03 - 00:01:19:39
Now click on the receipt number. This will show you the transaction receipt and all of the relevant details. To refund the transaction, simply click the refund button. Some payment methods, including credit card and direct debit, can be refunded instantly through SwiftFox. Other payment methods such as cash or cheque will show an alert reminding you that you will need to send the refund manually.
00:01:19:43 - 00:01:42:13
The final step is to click confirm. Now you can see the transactions table has updated the status of the transaction to show it has been refunded. So there we go. That's how easy it is to give a refund to your contact in SwiftFox. Be sure to check out all of our other videos in the finance series to get right across all of the financial features that SwiftFox has to offer.

001-09 Event insights
00:00:04:08 - 00:00:10:13
Hey there event enthusiasts! Today we're exploring how to track event attendance in SwiftFox.
00:00:10:22 - 00:00:23:43
Think of it as your ultimate event command centre, where every RSVP and attendance is neatly organised. For organisations that love hosting events and who doesn't? This feature is your new best friend.
00:00:23:47 - 00:00:34:34
Let's look at what SwiftFox can show you. Every event your attendees have graced with their presence. And how many people from a specific organisation have joined your events.
00:00:34:38 - 00:00:57:09
Let's start with an organisation's profile, shall we? On an organisation's record. Head over to the Insights tab. Here you'll find a table showing everyone's event history linked to that organisation. This includes who attended which event they joined. When it happened, and their RSVP status. Yes, even the maybes.
00:00:57:13 - 00:01:12:32
Want to time travel? Filter the table by date range to view attendance for specific periods. Clicking an event name whisks you away to the event details. Select a person's name to visit their contact profile.
00:01:12:36 - 00:01:26:25
The RSVP statuses you see here depend on your organisation settings. To customise which RSVP statuses appear. Visit settings, then event RSVP options.
00:01:26:29 - 00:01:33:24
Want a status to show up in your insights? Just tick show in Insights for that status.
00:01:33:28 - 00:01:51:02
Now let's peek at individual profiles. Like organisations, select the Insights tab. You'll see their event history. Event name, date, and RSVP status all in one place. Filter by date range here to perfect for checking recent engagement.
00:01:51:06 - 00:02:01:01
This feature gives you a crystal clear view of how your contacts are engaging with your events. whether you're looking at individuals or entire organisations.
00:02:01:05 - 00:02:06:07
And that's it. Until next time, keep those events rolling and those insights flowing.

019-03 Add events to your portal
00:00:05:32 - 00:00:18:41
Ready to take your events to the next level? Well in this lesson, we'll show you how to showcase your SwiftFox events in the Login Portal, making them more accessible and engaging for your members than ever before.
00:00:18:45 - 00:00:31:49
When you publish events in the portal, your contacts can see events that match their interests and membership level, book tickets with their details already filled in and access exclusive member only events.
00:00:32:03 - 00:00:39:20
In this lesson, we'll cover how to add an event to your portal and viewing the event in your portal.
00:00:39:24 - 00:00:47:43
Note: you'll need a SwiftFox Login portal or SwiftFox website to use this feature. Let's dive in and make your events shine!
00:00:47:47 - 00:00:59:16
Before we can showcase your event in the portal, we'll need to create it first. Navigate to events in SwiftFox and select Create Event and follow the set up process.
00:00:59:20 - 00:01:09:38
Need help with event creation? Our SwiftFox Events Academy course has you covered with detailed guidance, so if you lost, go check those out first.
00:01:09:42 - 00:01:27:20
Once you've set up your event, head to the overview step. Here's where the magic happens. You'll spot a tab called Publish, this is where you decide where your event will live. Whether that's on your main website, a SwiftFox website page, or in the Login Portal.
00:01:27:24 - 00:01:50:25
To publish your event in the portal find the website page dropdown in the publish tab. Scroll down and select your Login Portal. Choose which page you'd like the event to appear. For most users this will be the events page. Next up, let's set up your RSVP form. Select the RSVP form dropdown and choose your preferred form.
00:01:50:29 - 00:02:17:01
Here's a handy tip from portal only events SwiftFox automatically recognises logged in users. This means you can skip the contact details block in your RSVP form. We've already got their information. However, if you're also sharing this event on your public website, you might want a separate RSVP form that includes contact details for external users. Since external users will not be pre identified.
00:02:17:05 - 00:02:25:25
After adding your event to the portal, you'll see it appear in the confirmation table and you can add an eye catching cover image.
00:02:25:29 - 00:02:34:31
This image will make your event stand out in the portal listing, helping members quickly find what interests them. Now let's see how your event looks in action.
00:02:34:32 - 00:02:54:32
Open your Login Portal and go to the events page. Your newly added event will be displayed showing the event name. The event details and your cover image. Select the event to see the full details page. From here, your contacts can easily review all the information and RSVP page.
00:02:54:36 - 00:03:00:48
Remember, since they're in the portal SwiftFox knows who they are, so no need to fill in those details again.
00:03:01:02 - 00:03:12:32
Select RSVP. Choose a ticket type, such as a discounted member ticket. Select submit to complete the registration. And just like that, the booking is done.
00:03:12:36 - 00:03:20:49
And there you have it. We've walked through how to showcase your events in the portal, making them more accessible and engaging for your members.
00:03:21:03 - 00:03:31:12
With this feature, you're not just listing events, you're creating a seamless experience where members can discover, book, and attend events that matter to them.
00:03:31:16 - 00:03:39:40
Ready to create more amazing experiences for your members? We'll then check out our other lessons to learn more about SwiftFox's powerful features.

019-08 Publish events to the Login Portal
00:00:05:09 - 00:00:16:16
Today we're diving into the wonderful world of event publishing, and trust me, it's more exciting than it sounds. I've got my latest event built in SwiftFox and it's ready to roll.
00:00:16:20 - 00:00:28:40
While email and SMS notifications are great, our members practically glued to the website portal. I see you, portal enthusiasts. I see you there, so let's make sure our event shines too.
00:00:28:49 - 00:00:35:14
Starting from the overview stage where all our event data is live, we’ll navigate to the Publish tab.
00:00:35:18 - 00:00:42:43
First you see a list of all portal pages that can showcase SwiftFox Events. Since this event is a show stopper.
00:00:42:45 - 00:00:54:44
Let's feature it on the homepage by selecting it from the dropdown. Select your preferred RSVP form. Hit add and voila! Your event instantly appears on the portals homepage.
00:00:54:48 - 00:01:11:16
Want maximum visibility? Well, let's also add it to the main events page. It's as simple as rinse and repeat. And pro tip A stunning cover image can make your event stand out from the crowd. Just drag and drop your chosen image into the cover image section.
00:01:11:20 - 00:01:24:01
And there you have it. Your event is now living its best life on the portal. Remember, a well published event is a well attended event. Thanks for watching. Until next time, keep those events flowing.